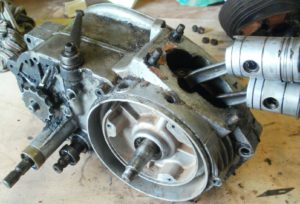
After riding the bike on the road for a few miles, I decided that a rebuild was overdue. Starting became increasingly difficult and I was beginning to think that the crank seals had gone. Not surprising really – the right hand main bearing was so worn it was noticeable by moving the magneto flywheel. Not great for the timing either!
Eventually the kickstarter developed a fault – it became stuck and wouldn’t release. Bump starting the bike worked, but resulted in a horrible ratcheting noise.
I was lucky and found a whole spare engine (including magneto) online for under £200 delivered. So I temporarily swapped engines whilst I rebuilt the original. This engine is just as bad – even more play in the mains and a barrel which has been off at some point. Too bad they didn’t tighten the nuts properly, as the barrel rattled loose one day. So rebuilding the original engine moved up the priority list.
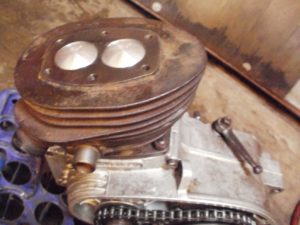
First step was to remove the head, barrel and pistons. This was easy enough, remember to undo the bolts in a diagonal sequence.
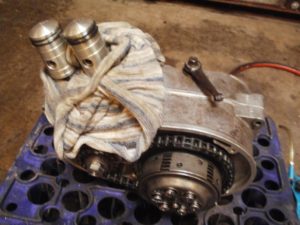
It revealed some damage to the pistons – each had a chunk taken out of its skirt, and it looked like it was from being struck by the conrod(s). I was told later this was probably caused by the last time someone removed the cylinder
Next step was to remove the clutch and primary drive. The clutch spring are retained by threaded collars, which need the “tab washer” to be pushed back by a screwdriver to disengage the notch and allow rotation. Once all collars were removed, the clutch plates were removed and kept in their original order. I didn’t bother with replacement as there seemed to be enough material there and replacement can be done with the engine still in the frame.
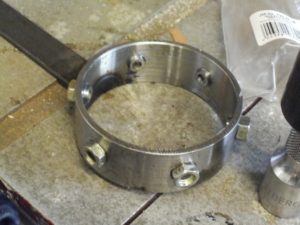
I needed a way of holding the clutch basket properly, so I made a holder from a short length of 3” diameter, thick wall steel tubing. I turned down the internal diameter to suit the basket centre, and drilled and tapped 6 holes. Brake nipples were turned down to match the slots in the basket, screwed in place and a handle was welded in place. Whilst it’s a very nice holder, it is typical that a week later I saw a suitable holder available online for £25.
The nut was then removed – it wasnt tight, and from memory it was a standard right hand thread. It’s M14x1.0 – a fine thread. If, like me, you lose the nut, it’s the same thread as a fiat (124, 128) track rod end.
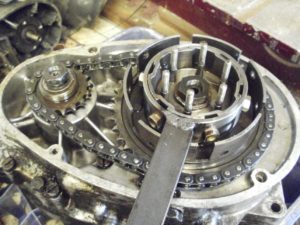
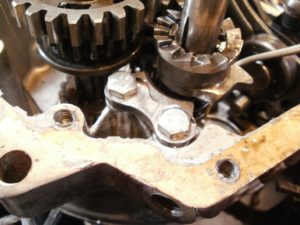
The primary drive sprocket was next. The crankshaft was locked with a pin through the main conrod, resting on 2 blocks of wood. The nut wasn’t tight, but the taper was.
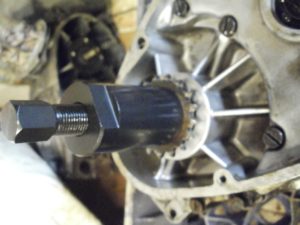
The puller is the same as used on a KTM (JMP 722 49 18), so one was bought online. That was £25 well spent – it needed a lot of force and a few good whacks with a mallet. I also made a cap to protect the crankshaft end from the force bolt. Well worth the extra time, as it saved the thread. No chance would it have been removed with a three legged puller (well, without damage)
The secondary drive sprocket was next, with a three legged puller being used to get it off the taper. Take care not to lose the key. I wasn’t particularly worried about damaging it – 60 years of use had taken its toll.
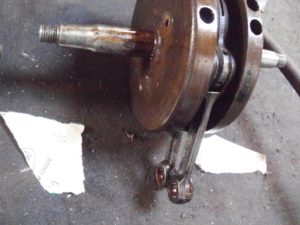
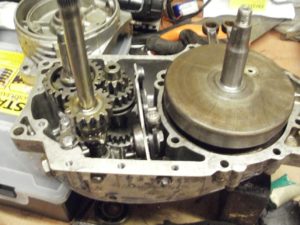
All circlips within the crankcases were removed. The bolts were removed, and the crankcase literally fell apart! The crank was removed easily.
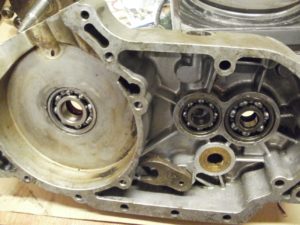
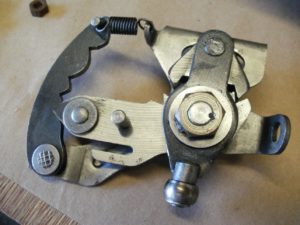
This revealed that the gearbox was in remarkably good condition. Looked Almost new! The only damage was the kickstart plate, well, the bolt which attaches it to the crankcase. This plate engages with a ratchet-tooth cam on the kickstart shaft, which withdraws away from the kickstart gear when the lever springs back. This explains the ratcheting noise, and why the kickstart didn’t work.
A pair of 8.8 grade bolts and a new tab washer were used to retain the plate. I also ground down the ramp on the plate, and on the cam gear itself, to ensure smooth operation.
The engine was thoroughly cleaned, as it was filthy inside and out – in particular the oil feed drilling on the big end. Some of the bearings fell out whilst being steam-cleaned off, some required a bit of heat and were tapped out with a hammer and suitably sized socket against the outer race.
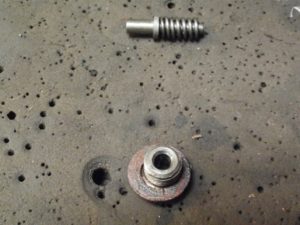
One of the gearboxes bearings are in a blind hole, next to the clutch pushrod cam. Driving this out with a sprocket would therefore not work, nor would hitting the inner face with a drift, through the hole (where the clutch pushrod is fed through) as it would have wrecked the threads. So I made a split puller, which is a length of mild steel machined down to the inner diameter of the bearing, with a larger diameter boss at the end. The slots allow the puller to be inserted into the bearing, from the inside. An m6 threaded hole at one end allows a length of threaded bar to be screwed in, opening the puller. A nut, washer and length of tube allows the puller to force out the bearing, resting against the crankcase journal. It was surprising how well it worked, but a lot of force was needed to get it out, as the journal had been hit with a hammer and chisel around its circumference to stop the bearing from coming out.
The cases were reheated, and the new bearings (which are all standard sizes), shims and seals were refitted as per how I disassembled it. I used some bearing fit adhesive to keep the gearbox ones in place, save using a chisel like the original method.
The gearbox was reassembled, and the sprung plunger was adjusted to make sure the kickstarter disengages. The plunger needed to be put in the lathe, to remove any sharp edges, which was preventing it from springing back into its recess. A new washer was found.
The gear quadrant was refitted. Whilst I never nticed any gearbox issues, the return spring for the slector quadrant was broken. Fortunately I found one at an autojumble, and at 50p it was by far the best purchase so far.
A new gasket was drawn up in cad and cut out from 0.4mm gasket paper on the laser cutter. It matched the previous thickness, so no additional shimming was required.
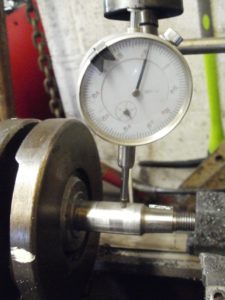
The crank big end was left alone, as there was very little play. However I did true up the cranksaft as it was about 12thou out of alignment!. The little end bushes were oval, but were undersized enough to be reamed out to 14mm
The crank was fitted, using heated madrels to expand the two left hand bearings. The right hand bearings were fitted into the crankcase. Again, heat was used to fit them, and bearing fit adhesive was used to keep them in place.
The right hand crankcase was fitted, not forgetting the gasket and gearchange shaft. The old bolts were re-used (m7 is hard to find in anything other than hex bolts) and retightened.
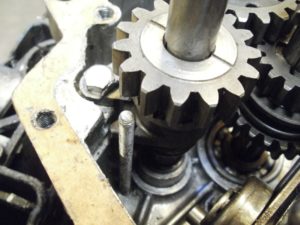
Initially there were no gears – the selector shaft just wouldn’t turn. However later I found this was caused by the shaft being too far into the crankcase, and the fork was fouling on the selector mechanism. This was solved (after splitting the cases again) by fitting the original external circlip which was there beforehand (d’oh).
The crank turned in lumps and the usual method of give the ends a good whack didn’t work. So I split the cases once more, and removed the shim from the left hand journal. This meant renewing the inner 6302 bearing, just in case it was damaged during removal.
Having joined the cases for a 4th time, the crank now turned, the kickstart worked and we had gears – at long last!
A tip for fitting the crancases – put a long m4 bolt through one of the crankcase holes, to prevent the kickstart shaft from turning. Dont forget to remove it
The primary drive and clutch was reffitted, as were the clutch plates

Next task was the rebore. Pistons were actually easy to get hold of. A couple of months and £150 later I had a pair of pistons. The barrel was just under 39mm diameter, so not enough material there to use a 39mm piston, so it had to be 39.2mm, shame, as it means it can only be rebored once again before it has to be scrapped or sleeved.
I was unable to find a workshop manual, or anything online for the piston clearance. Instead I bought a manual for the puch 125SV (which is very similar). It stated that the piston ring gap should be 0.1mm, with 0.8 being the service limit. Pistons were refitted with new clips rings and pins and the freshly rebored barrel was refitted with a new gasket. I re-used the old head gasket.
I re-fitted the engine, and took the opportunity to temporarily remove the legshilds, as I don’t think that was doing anything to help with cooling.Before refitting the magneto, I reqired the ignition coil and points, which were shorting out, with new silicone wire.
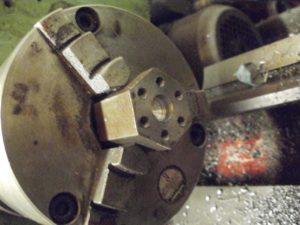
I wanted to fit a larger sprocket, from 13 teeth to 14. Besides, the old one was worn out. The old sprocket was mounted on a tapered mandrel and turned down in the lathe to remove the teeth.
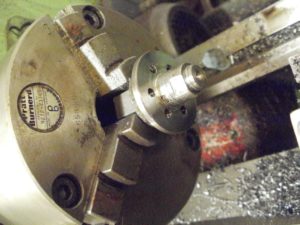
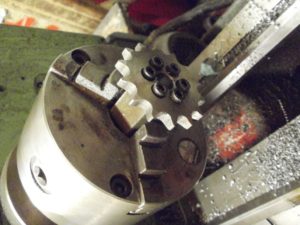
Then it was transferred into the mill’s rotary table to be drilled and tapped.
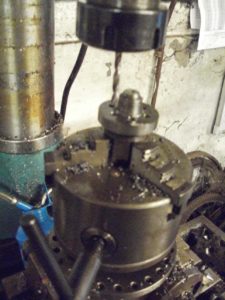
This acted as a drive boss, where a new sprocket can be bolted on. The new sprocket (14 teeth, 08B pitch) was bought online, mounted onto a mandrel and drilled out & countersunk to recive 6no high tensile m5 bolts.

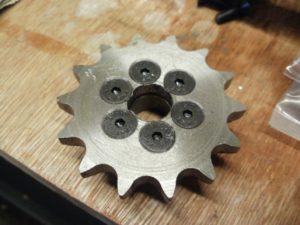
I also bought a 15 tooth sprocket, but this was too big and would foul on the kickstart shaft housing on the crankcase.
I refitted the covers, filled it with fresh oil and attempted to start it. It fired up very easily, but it’s now a case of very careful running in. I attempted to ride to the nearby autojumble, but ended up partially seizing it after about a mile. It restarted fine, but I pushed it home in the end to be safe. Really I need to run it in on a flat road, which is a problem when I live in a hilly area! In hindsight a little more piston clearance might have been a better bet